There aren't many places to mount water bottles on this bike with easy access. The practical solution is a handlebar mount bottle cage.
The mounting bracket was too big for the handlebar. So I wrapped the handlebar with several layers of electrical tape to increase the diameter. Now it's on there securely.
"Tough as a rhinoceros, fleet as a gazelle, durable as a crocodile, easy to maintain and designed specifically to provide effective, affordable transportation to those who need a bike that gets the job done-no matter if it's dirt roads or psycho-habituated roadways. As a sign of our commitment to the goodness that is the bicycle, for every two AfricaBikes sold, one is donated to a good works cause in challenged areas around the world." - KONA
Tuesday, May 29, 2012
Wednesday, April 18, 2012
Brooks Saddle Mod
I punched some holes along the sides of my saddle and laced it up. I used a pair of "hole punch pliers" (from Home Depot for $10) to make the holes, and some paracord to lace it.
It wasn't easy punching out the holes, but I eventually got it. The holes are 4mm in diameter, spaced about a centimetre apart, and sealed up with Sno Seal.
The saddle is noticeably firmer, but still comfortable. It's definitely worth doing if the sides of the saddle are starting to flair out too much, or if you want to firm it up a little.
TIP: When lacing up the sides, don't pull them together tightly. Try to keep the sides where they are while keeping the paracord snug. Otherwise the saddle will feel like a rock.
2'ND TIP: Punch even number (2, 4, 6, 8, etc) of holes per side. This makes the paracord lacing look neater, and allows you to hide the knot under the saddle.
It wasn't easy punching out the holes, but I eventually got it. The holes are 4mm in diameter, spaced about a centimetre apart, and sealed up with Sno Seal.
The saddle is noticeably firmer, but still comfortable. It's definitely worth doing if the sides of the saddle are starting to flair out too much, or if you want to firm it up a little.
TIP: When lacing up the sides, don't pull them together tightly. Try to keep the sides where they are while keeping the paracord snug. Otherwise the saddle will feel like a rock.
2'ND TIP: Punch even number (2, 4, 6, 8, etc) of holes per side. This makes the paracord lacing look neater, and allows you to hide the knot under the saddle.
Tuesday, April 17, 2012
Problem With Saddle?
My Brooks saddle has developed a weird ridge. It doesn't effect riding, or the comfort. It's just an eyesore...for now.
I didn't buy it new from a store. It supposedly came off a brand new bike according to the previous owner. I believe him, cause it looked new and didn't have any "sit bone" imprint.
If this saddle starts to rip, I'll replace it with a Gyes saddle. I've read some good reviews on them.
NOTE: The outline of the imprint is from the "nose cap" (?) of the saddle chassis. I don't know why it's like that. I've seen other broken in Brooks saddles that don't have this imprint.
I didn't buy it new from a store. It supposedly came off a brand new bike according to the previous owner. I believe him, cause it looked new and didn't have any "sit bone" imprint.
If this saddle starts to rip, I'll replace it with a Gyes saddle. I've read some good reviews on them.
NOTE: The outline of the imprint is from the "nose cap" (?) of the saddle chassis. I don't know why it's like that. I've seen other broken in Brooks saddles that don't have this imprint.
Monday, April 16, 2012
Rust & Flaking Paint
After riding through this mild winter, my bike has developed some rust spots. It's not a big deal. This bike was built to be used after all.
What caught me by surprise was the flaking paint on the "chain case bracket". I thought this bike was powder coated. I don't think powder coating is suppose to flake off.
Anyway, it's all good. I still think it's an awesome bike.
What caught me by surprise was the flaking paint on the "chain case bracket". I thought this bike was powder coated. I don't think powder coating is suppose to flake off.
Anyway, it's all good. I still think it's an awesome bike.
Wednesday, January 11, 2012
Cyclocomputer
I always wondered how fast and far I ride so I bought generic cyclocomputer from ebay. It works well, but it's a little sluggish with it's readings because of the cold weather.
It's easy to read, has 2 big buttons, water proof, and feels solidly built. There are a few minor issues though. The instructions, and the screw used to attaches the fork sensor could be better.
This unit does what it's suppose to and it's only $5. I would recommend it for anyone looking for a basic bicycle computer.
P.S. I'm gonna change the way the wire is routed. Just too lazy to do it now.
UPDATE FEBRUARY 20, 2012: Without going nuts, the top speed I can achieve on this bike is about 20kph (12mph) on level ground.
It's easy to read, has 2 big buttons, water proof, and feels solidly built. There are a few minor issues though. The instructions, and the screw used to attaches the fork sensor could be better.
This unit does what it's suppose to and it's only $5. I would recommend it for anyone looking for a basic bicycle computer.
P.S. I'm gonna change the way the wire is routed. Just too lazy to do it now.
UPDATE FEBRUARY 20, 2012: Without going nuts, the top speed I can achieve on this bike is about 20kph (12mph) on level ground.
Wednesday, January 4, 2012
Removed The Fenders
I removed the fenders a week or two ago for no particular reason. It was just something to do on a cold winter day. haha
This won't be a permanent thing. Sooner than later I'll have to put them back on. So far, the winter in Toronto has been dry and mild enough to ride without fenders.
There are a few advantages for removing them.
This won't be a permanent thing. Sooner than later I'll have to put them back on. So far, the winter in Toronto has been dry and mild enough to ride without fenders.
- It's easier to transport in my car after removing the wheels.
- Knocked off a bit over 1 pound or 477 grams.
Tuesday, December 13, 2011
My Favourite Upgrades (so far)
These products made the biggest difference on my bike.
- For comfort, it's the Brooks B67s saddle without a doubt. Especially since it's broken in now. It's so comfortable I hardly notice it.
- For handling, the Misfit FME handlebar is the ticket. It feels better balanced, but I lose some of the sit up riding position.
- For extra speed, the Specialized FatBoy 1.25" tires helps me ride faster with less effort compared to the original tires.
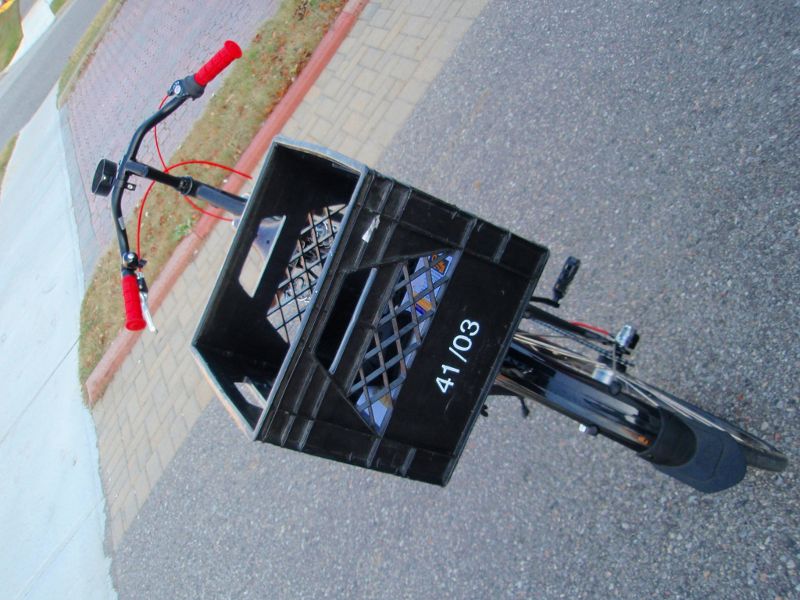
- For utility, the milk crate is hard to beat. It carries more than the front basket, and it can be removed/installed easily.
- The icing on the cake is the Kool Stop Thinline (salmon) brake pads. The improvement is awesome.
The best upgrade of all time is proper bike set-up. Once everything is dialed in, riding feels so much better. I had to ride often, and be self aware to know what needs adjusting/changing.
Monday, December 5, 2011
Frame Pump
I was checking out CO2 inflators, mini pumps, and frame pumps. They all had their pros and cons, but in the end I wanted a frame pump. The problem was how to fit one on my bike.
The solution is the Park Tool PMP-5. The length is adjustable so it can mounted in different locations. Installing it between the top tube (?), and down tube was the easiest.
It's on there pretty good. I doubt it'll fly off during a ride.
UPDATE DECEMBER 9, 2011: I used black electric tape to wrap the silver part of the pump. Now it looks cooler.
Saturday, December 3, 2011
Gear Tie
Gear Tie is a cool product. I got the 32" version. It's a heavy duty rubber coated twist tie.
It's a better way to secure a milk crate to my bike than with zip ties. They're reusable, and holding as securely as the zip ties did.
There's two 32" length per package. I cut both of them with side cutters to get eight 8" pieces. I used all of them to secure the milk crate.
P.S. I sealed the cut ends with electric tape after the pictures was taken.
Thursday, November 24, 2011
Brake Upgrade
The original brake pads on my bike were adequate to slow me down. I wanted more stopping power so I upgraded to a set of Kool Stop Thinline Salmon pads.
After installing the brake pads, one of the caliper arms was stuck to one side. I gave up troubleshooting it and installed a spare set of Avid Single Digit 5. The front fender was lowered so the calipers can clear it.
The difference in braking is like night and day. It's way stronger and smoother than the factory set-up. I should have upgraded the brakes when I got the bike.
UPDATE FEBRUARY 18, 2012: These brakes have been squealing something fierce lately. =/
UPDATE MARCH 11, 2012: The brakes suddenly stopped squealing. I wonder if it has something to do with the warm weather (17° Celsius or 62.6° Fahrenheit)?
After installing the brake pads, one of the caliper arms was stuck to one side. I gave up troubleshooting it and installed a spare set of Avid Single Digit 5. The front fender was lowered so the calipers can clear it.
The difference in braking is like night and day. It's way stronger and smoother than the factory set-up. I should have upgraded the brakes when I got the bike.
UPDATE FEBRUARY 18, 2012: These brakes have been squealing something fierce lately. =/
UPDATE MARCH 11, 2012: The brakes suddenly stopped squealing. I wonder if it has something to do with the warm weather (17° Celsius or 62.6° Fahrenheit)?
Wednesday, November 23, 2011
PDW Bar-Ista
I got my Portland Design Works Bar-Ista cup holder from Mountain Equipment Co-Op. There is free shipping till December 7.
Installation is straight forward. Just fit it over the handlebar and tighten it with a 4mm allen (hex) key. I set mine in front of the handlebar. Mounting it the other way takes up precious real estate that makes hopping on and off the bike weird.
I picked up a Eco2 cup at Walmart. I trimmed the band so it can sit lower in the holder. Now I can ride with a hot cup of Ovaltine (I love that stuff). Just in time too. It's getting pretty cold these days.
UPDATE DECEMBER 1, 2011: This setup works great. The cup never flew out, and it keeps my drink hot/warm. Just make sure the cup is screwed on, and the flap is closed. Occasionally, a bit of Ovaltine manages to splash out when I hit a bump at speed.
Installation is straight forward. Just fit it over the handlebar and tighten it with a 4mm allen (hex) key. I set mine in front of the handlebar. Mounting it the other way takes up precious real estate that makes hopping on and off the bike weird.
I picked up a Eco2 cup at Walmart. I trimmed the band so it can sit lower in the holder. Now I can ride with a hot cup of Ovaltine (I love that stuff). Just in time too. It's getting pretty cold these days.
UPDATE DECEMBER 1, 2011: This setup works great. The cup never flew out, and it keeps my drink hot/warm. Just make sure the cup is screwed on, and the flap is closed. Occasionally, a bit of Ovaltine manages to splash out when I hit a bump at speed.
Monday, November 14, 2011
Sealed Cartridge Bearings?
I was gonna overhaul the bottom bracket till I came across this (see picture). I was expecting to see the standard one piece bottom bracket setup.
It looks like sealed cartridge bearings. I didn't know they make it for one piece cranks. If it is...it shouldn't require any maintenance for a long time. Anyway, I couldn't remove it easily so I left it alone.
P.S. To remove the locknut you'll need a 30mm wrench.
It looks like sealed cartridge bearings. I didn't know they make it for one piece cranks. If it is...it shouldn't require any maintenance for a long time. Anyway, I couldn't remove it easily so I left it alone.
P.S. To remove the locknut you'll need a 30mm wrench.
Tuesday, November 8, 2011
OURY Mountain Grips
I just installed a pair of red OURY grips. They feel great with or without gloves.
Both grips were kept at standard length. Shifting feels the same even with the extra length.
I cleaned the handlebar with Windex and used rubbing alcohol to install the grips. I put a nickel in each grip to act as bar end caps. That should prevent the handlebar from punching a hole through the grip.
UPDATE NOVEMBER 17, 2011: The combination of these grips and the Misfit Psycles FME bar gives me a lot more knee/handlebar clearance for those super tight, slow speed turns.
UPDATE NOVEMBER 29, 2011: I left out two points that may help prevent the grips from twisting.
Both grips were kept at standard length. Shifting feels the same even with the extra length.
I cleaned the handlebar with Windex and used rubbing alcohol to install the grips. I put a nickel in each grip to act as bar end caps. That should prevent the handlebar from punching a hole through the grip.
UPDATE NOVEMBER 17, 2011: The combination of these grips and the Misfit Psycles FME bar gives me a lot more knee/handlebar clearance for those super tight, slow speed turns.
UPDATE NOVEMBER 29, 2011: I left out two points that may help prevent the grips from twisting.
- I wrapped the ends of my handlebar with 4 revolutions of duct tape (just the width of the tape) to make it a little thicker.
- The handlebar ends stick pass the grip a bit. You can see it a bit on the 3'rd picture on this post.
Wednesday, November 2, 2011
Red Cables
Today I installed a new brake, and shifter housing. This was done for aesthetic reasons. The original ones are still in good condition.
The new cables were cut 6" shorter than the original to make the cable routing tighter. I used a Dremel with a cutting wheel to make smooth flat cuts without crushing the housing.
I applied a light coating of Finish Line Dry Teflon Lube (for bicycle chain) on the cables before inserting it into the cable housing.
This could all be in my head but it's shifting smoother/easier. Is it because of the shorter cable? The lube? I dunno. = /
The new cables were cut 6" shorter than the original to make the cable routing tighter. I used a Dremel with a cutting wheel to make smooth flat cuts without crushing the housing.
I applied a light coating of Finish Line Dry Teflon Lube (for bicycle chain) on the cables before inserting it into the cable housing.
This could all be in my head but it's shifting smoother/easier. Is it because of the shorter cable? The lube? I dunno. = /
Thursday, October 27, 2011
Misfit Psycles FME Bar
I picked up a Misfit Psycles FME handlebar today. For $22 it's hard to go wrong. It provides a better wrist/hand position for control, and it's almost half the weight of the factory one.
The factory Kona handlebar weights 607 grams. The Misfit FME bar weights 336 grams.
To install it, I had to pry the stem clamp open a bit to slide the centre section of the handlebar in. I probably could have rammed it in, but I didn't want to scratch the finish. =)
The FME's riding position feels similar to the bar it replaced, and has more handlebar/knee clearance for tight, slow speed turns.
UPDATE NOVEMBER 11, 2011: The price of the handlebar went up. Yikes!
UPDATE NOVEMBER 18, 2011: The extra bit of drop and reach from this bar puts extra weight over the front wheels. The bike feels more balanced and puts me in a slightly more aggressive riding position.
UPDATE NOVEMBER 28, 2010: I can feel the handlebar flex a little on rough surfaces. It takes a little edge off the bumps.
The factory Kona handlebar weights 607 grams. The Misfit FME bar weights 336 grams.
To install it, I had to pry the stem clamp open a bit to slide the centre section of the handlebar in. I probably could have rammed it in, but I didn't want to scratch the finish. =)
The FME's riding position feels similar to the bar it replaced, and has more handlebar/knee clearance for tight, slow speed turns.
UPDATE NOVEMBER 11, 2011: The price of the handlebar went up. Yikes!
UPDATE NOVEMBER 18, 2011: The extra bit of drop and reach from this bar puts extra weight over the front wheels. The bike feels more balanced and puts me in a slightly more aggressive riding position.
UPDATE NOVEMBER 28, 2010: I can feel the handlebar flex a little on rough surfaces. It takes a little edge off the bumps.
Saturday, September 24, 2011
Removed The Chain Guard
Work has finally eased up a bit. Now I have a chance to ride my bike.
I removed the chain guard for no particular reason. I never really like the way it looked. It's too "swooshy". The type of chain guards on old three speed bicycles would look better.
I also reinstalled the kickstand too (not shown in this picture). It was to useful to leave off.
UPDATE: Chain gaurd and bracket weighs 170 grams.
I removed the chain guard for no particular reason. I never really like the way it looked. It's too "swooshy". The type of chain guards on old three speed bicycles would look better.
I also reinstalled the kickstand too (not shown in this picture). It was to useful to leave off.
UPDATE: Chain gaurd and bracket weighs 170 grams.
Sunday, May 22, 2011
Saturday, May 14, 2011
New Seat Post
I installed an aluminium seat post today. It's a micro adjustable type. I bought it @ ebay. It got here fast, but it took awhile to clear Canada Customs. >=(
The seat post size for the 2010 Kona AfricaBike is 27.2 mm.
Saturday, May 7, 2011
Weight
After removing my kickstand (8mm Allen or hex key), I'm gonna try to weigh all the parts I've changed or removed.
My bike originally weighed approximately 19 kg (42 lbs). Now it's about 15 kg (34 lbs). I'm not a weight weenie, but it's neat to know these things.
P.S. This list will constantly be updated.
P.S.S. I weighed it today (July 1, 2011) and updated this post.
UPDATE NOVEMBER 18, 2011: The kick stand goes back on. =)
UPDATE JANUARY 18, 2012: Weighed the whole bike with a digital hanging scale today. Before I used a bathroom scale. That was pretty difficult and not very accurate. The official weight is 15.19 kg or 33.48 lbs.
- Basket, bracket, and bolts 955 grams
- Kona bell (haven't weighed it yet)
- Bell I'm using now (haven't weighed it yet)
- Kona Stem (steel) 522 grams
- Profile Design Stem 282 grams
- Kona handlebar 670 grams
- Misfit Psycle FME handlebar 336 grams
- Kona grips 121 grams
- Oury grips 100 grams
- Kona saddle 486 grams
- Brooks B67s saddle 810 grams
- Chaingaurd and bracket 170 grams
- Wheel lock with key 404 grams
- Kickstand 182 grams
- Wheel & pedal reflectors 48 grams
- Specialzed 1.25" Fatboy tires 390 grams x 2
- New seat post collar 21 grams (haven't weighed the old one)
- Original inner tubes (haven't weighed it)
- Specialized inner tubes (haven't weighed it)
- Kona seat post 401 grams
- Aluminum seat post 259 grams
- Original pedals 245 grams x 2
- Tektro 849 AL linear pull calipers only (no pads) 119 grams
- Avid Single Digit 5 linear pull calipers (haven't weighted it)
- Kool Stop Thinline brake pads (haven't weighed it)
- Front/rear fender 477 grams
- Cyclocomputer 44 grams
My bike originally weighed approximately 19 kg (42 lbs). Now it's about 15 kg (34 lbs). I'm not a weight weenie, but it's neat to know these things.
P.S. This list will constantly be updated.
P.S.S. I weighed it today (July 1, 2011) and updated this post.
UPDATE NOVEMBER 18, 2011: The kick stand goes back on. =)
UPDATE JANUARY 18, 2012: Weighed the whole bike with a digital hanging scale today. Before I used a bathroom scale. That was pretty difficult and not very accurate. The official weight is 15.19 kg or 33.48 lbs.
Saturday, April 23, 2011
A New Old Bell
I have a vintage bell that I wanted to use. It's in rough condition, but it still works like a charm.
Since I wrapped my handlebar with paracord, the factory bell had to be relocated. It was in the way of my new found hand positions. Besides, it wouldn't fit over the handlebars anyway.
I decided to attach this new old bell to the stem. The screws were too short so I bought some longer ones (M4 .70 20).
UPDATE NOVEMBER 2, 2011: I removed this bell and installed a different one.
Since I wrapped my handlebar with paracord, the factory bell had to be relocated. It was in the way of my new found hand positions. Besides, it wouldn't fit over the handlebars anyway.
I decided to attach this new old bell to the stem. The screws were too short so I bought some longer ones (M4 .70 20).
UPDATE NOVEMBER 2, 2011: I removed this bell and installed a different one.
Subscribe to:
Posts (Atom)